Modifying Setup Information
In the setup section of the configuration folder, you can enter or edit information for the Ektron Web site including:
- License keys
- Default language
- Summary sizes
- email notification
- Physical library folders on file server
- Builtin user information
- Editor options
- Work page size settings
You must complete this before any user can access your Ektron Web site.
NOTE: Only Administrator Group members can view and edit the Application Setup screen.
To update setup information from the Ektron Workarea, choose Settings. The Application Setup screen appears with the General Tab showing. Click Edit to modify the settings.
General Tab
Show the General tab field descriptions
|
Field |
Description |
|
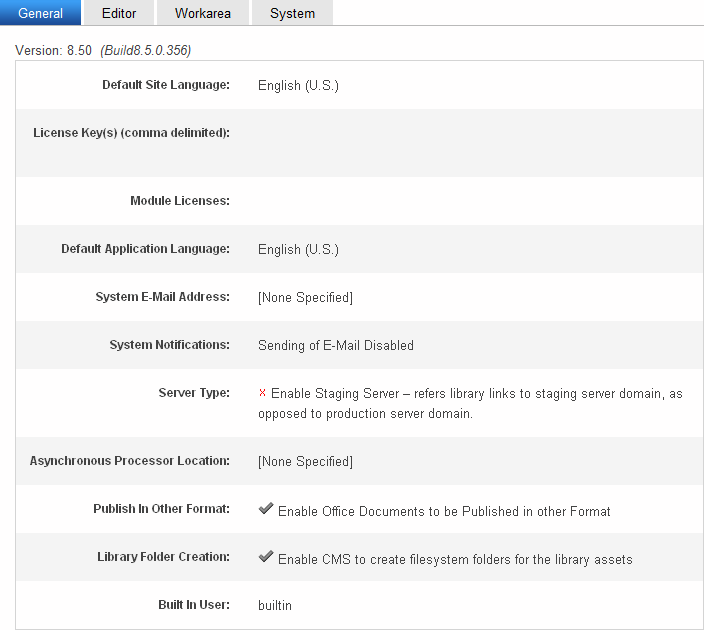
Version |
This number shows the Ektron version and build numbers. This number is important to know if you place a call to Ektron Support. |
|
Enter the license key sent to you from Ektron. |
|
|
Module Licenses |
Enter the license key for WebImageFX that was sent to you via email. See Enabling WebImageFX for more information. |
|
Select a default language for Ektron. How User Application Language Affects Use of Ektron This user’s language determines the screens and messages that appear in Ektron. How System Default Language Relates to User Language Setting In the user profile, you can set any user’s language to system default. Each user set to system default uses the language assigned here. NOTE: Do not confuse the default application language with the ek_ DefaultContentLanguage variable in |
|
|
In characters, specify a maximum size (in characters) for each content item. If a user creates or updates content that exceeds this limit, he is told to reduce the content before he can save it. The size cannot be less than 1,000,000 characters. NOTE: This field only appears if editor is set to eWebEditPro in the |
|
|
In characters, specify a maximum size (in characters) for the content summary. If a user creates or updates a summary that exceeds this limit, he is told to reduce the summary before he can save it. The size cannot be less than 65,000 characters. NOTE: This field only appears if editor is set to eWebEditPro in the |
|
|
Enter a valid email address. This address will appear in the From field in the notification emails. See Also: Configuring email for Tasks and Content |
|
|
Server Type: Staging Server |
Check this box if you want your library links to refer to the staging server domain, as opposed to the production server domain. This would help you verify that the linked items exist on the staging server. See Also: Step 3: Assign Multi-Site Capabilities in Ektron WARNING! Checking this box disables the Web Alerts feature on your server. |
|
If your site uses the Web Alerts feature, enter or update the location of the asynchronous processor Web Services file. The default location is “[none specified].” See Also: Setting Up Message Queuing and the Asynchronous Processor |
|
|
Check the box to allow Ektron to render Office documents in PDF format. When a checked, PDF generation is available for individual folders.See Also: Generating PDF Content |
|
|
Enable CMS to create file system folders for library assets |
Check the box if you want to create physical folders on your file system server that match the Ektron library folder tree. See Also: Creating File System Folders with Ektron |
|
Builtin User |
Edit the username and/or password for the built in user. By default, the username and password combination is builtin/builtin. WARNING! Ektron strongly urges you to change the default password assigned to the builtin user. An opportunity to do this is presented during installation. |
|
Field |
Description |
|
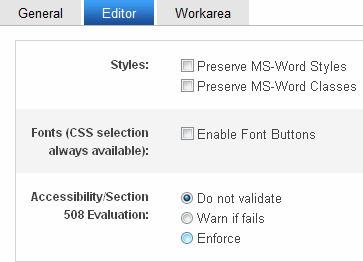
When Microsoft Word content is pasted into the editor, it removes some Word styles by default. Check this box if you want to prevent the editor from removing them. NOTE: Ektron does not recommend enabling this feature. |
|
|
Similar to styles, when Microsoft Word content is pasted into the editor, it removes some Word classes by default. Check this box if you want to prevent the editor from removing them. |
|
|
Checking this option displays the following font-related buttons on the editor toolbar:
|
|
|
Accessibility/Section 508 Evaluation |
If your editor is eWebEdit400: Setting Up Accessibility Validation |
|
Field |
Description |
|
The following fields change
The default values are automatically applied to all new users, and to all existing users when you upgrade. Normally, you can modify these values for any user via the Edit User screen. But, you can force these values on all users, removing the ability to personalize them. |
|
|
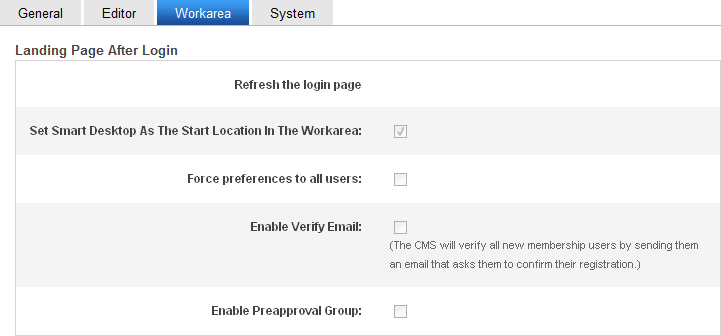
If you want one page in your Web site to appear after users sign in, enter the URL to that page. You can click Select Page to browse to the landing page. The last published version of the page appears. If the page has never been published, nothing appears. By default, the page from which the user logged in reappears. IMPORTANT: If you are logging in from the OnTrek sample site, this field is ignored. OnTrek has its own landing page after login, regardless of this setting. |
|
|
If you want the Smart Desktop to appear as soon as users enter the Workarea, click this box. By default, the user sees the Smart Desktop after sign in. If you leave this check box blank, when you enter the Workarea, you go to the folder of the content specified at theLanding Page after login field. |
|
|
If desired, change the width of the screen in which Ektron appears. The width in pixels must be between 400 and 2400. This field accommodates users who have larger monitors and/or prefer a higher resolution, such as 1280 x 1024. The default value is 790. |
|
|
If desired, you can change the height of the screen in which Ektron appears. The height in pixels must be between 300 and 1800. This field accommodates users who have larger monitors and/or prefer a higher resolution, such as 1280 x 1024. The default value is 580. |
|
|
Force Preferences to all users |
To force these settings on all Ektron users, check this box. If you do, users can see the values in the user profile screen but not change them. If you leave this box blank, users can personalize these values in their User Profile. |
|
Enable Verify email? |
Check this box if users should be notified whenever they subscribe to an email notification list. See Also: What Happens if Verification email is Used WARNING! When using the Checkout Server Control on an eCommerce site, the Enable setting must be unchecked. Otherwise, new users will receive an error message when they sign-up using this control. See Also: Checkout Server Control |
|
Enable PreApproval Group |
Use this field to enable Automatic Task Creation. See Also: Automatically Creating Tasks Associated with Content |
System Tab

Use this button if you need to clear Ektron's cache, which recycles the application pool. For example, you updated the web.config file but cannot yet see the changes.
Under certain circumstances, Ektron's support group may instruct you to click this button.
Administrators would use this button if they cannot access the hosting servers yet need to reset their Web site. The button is an alternative to submitting a request to their IT department or hosting company.
Impact on Ektron
After you click Restart, the first request takes longer than usual since the application needs to recompile. Subsequent requests should be processed normally.
To minimize the impact on site visitors, visit your home page immediately after the restart, so that your request is the first "hit."
See Also: How Application Pools Work (IIS 6.0) and Managing Application Pools in IIS 7


